Building a Medical Diagnostic Chatbot with First Order Logic
In this tutorial, we’ll build an interactive medical diagnostic chatbot that uses First Order Logic (FOL) for inference. This demonstrates how formal logic c...

In this post, I will explain a very indispensable tool for developers. Docker is a tool that allows developers to build, deploy, and run applications using containers. Containers allow a developer to package up an application with all parts it needs, such as libraries and other dependencies, and ship it all out as one package. By doing so, the developer can be sure that the application will run on any other machine regardless of any customized settings that machine might have that could differ from the machine used for writing and testing the code.
The major issue when working with a development team is that the code works on one machine but not on another. This is because the environment on which the code is running is different. Docker solves this problem by providing a container that can run on any machine.
A container is a standard unit of software that packages up code and all its dependencies so the application runs quickly and reliably from one computing environment to another.
A Docker container image is a lightweight, standalone, executable package of software that includes everything needed to run a piece of software, including the code, a runtime, libraries, environment variables, and config files.
Note: Docker containers are similar to virtual machines, but they are more portable, more resource-friendly, and more dependent on the host operating system.
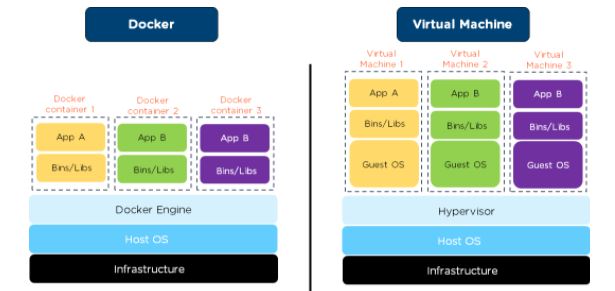
Virtual Machines (VMs) are more resource-intensive than Docker containers because they run a full copy of an operating system. While Docker containers share the host system’s kernel and require only the application code and libraries to run.
To get started with Docker, you need to install Docker on your machine. You can download Docker from the official website and follow the installation instructions.
Once you have installed Docker, you can run the following command to verify the installation:
docker --versionYou should see the Docker version installed on your machine. For example, if you have installed Docker version 20.10.7, you will see the following output:
Docker version 20.10.7, build f0df350
That’s it! You are now ready to start using Docker to build, deploy, and run applications using containers.
Let’s begin by a Python program and run it in a Docker container. You don’t need to have Python installed on your machine because the Python program will run inside the Docker container.
The Python program uses the ‘pandas’ and ‘streamlit’ libraries to read a CSV file and display it in a web application.
 mkdir my-python-app
 cd my-python-app
 import streamlit as st
 import pandas as pd
 st.title('Employee Dashborad')
 # read data from excel
 df = pd.read_excel('data.xlsx')
 #render the data in the web application
 st.write(df)
Add the ‘data.xlsx’ file to the same directory as ‘app.py’. You can download the sample data file from here.
 streamlit
 pandas
 openpyxl
 FROM python:latest
 WORKDIR /app
 COPY . .
 RUN pip install --no-cache-dir -r requirements.txt
 CMD ["streamlit", "run", "app.py"]
Lets break down the Dockerfile:
FROM python:latest: This line specifies the base image to use for the container. In this case, we are using the latest version of the Python image.WORKDIR /app: This line sets the working directory inside the container to ‘/app’.COPY . .: This line copies all the files from the current directory on the host machine to the ‘/app’ directory inside the container.RUN pip install --no-cache-dir -r requirements.txt: This line installs all the required libraries specified in the ‘requirements.txt’ file. The ‘–no-cache-dir’ option is used to avoid caching the installed packages.CMD ["streamlit", "run", "app.py"]: This line specifies the command to run when the container starts. In this case, we are running the ‘streamlit’ command to start the web application defined in the ‘app.py’ file.
To build the Docker image we use the following command:
docker build -t my-app .
To run the Docker container we use the following command:
docker run -p 8501:8501 my-app
To visualize the running web application in the Docker container, open your web browser and navigate to ‘http://localhost:8501’.
Hope you enjoyed reading this post and learned something new.
In this tutorial, we’ll build an interactive medical diagnostic chatbot that uses First Order Logic (FOL) for inference. This demonstrates how formal logic c...
Informed Search Algorithms Using Python Libraries
In this post, we will discuss the problem of generating all subsets of a given set of elements. A subset is a collection of elements that are selected from a...
Computing the exponentiation of a number is a classic problem in computer science. The problem is to find the value of a number raised to the power of anothe...
The maximum subsequence sum algorithm is a classic problem in computer science. The problem is to find the maximum sum of a contiguous subsequence in an arra...
In this post, I will explain a very indispensable tool for developers. Docker is a tool that allows developers to build, deploy, and run applications using c...
In this post, we will discuss the problem of generating all permutations of a given set of elements. A permutation is an arrangement of elements in a specifi...
The convex hull problem is a problem in computational geometry. It is about finding the smallest convex polygon that contains a given set of points. The conv...
Project 1: Project management system The aim of this project is to implement a program (java or python) that manages a list of tasks in a project. The pr...
Use the form link to choose a project :